WorkerBee API
*NOTICE
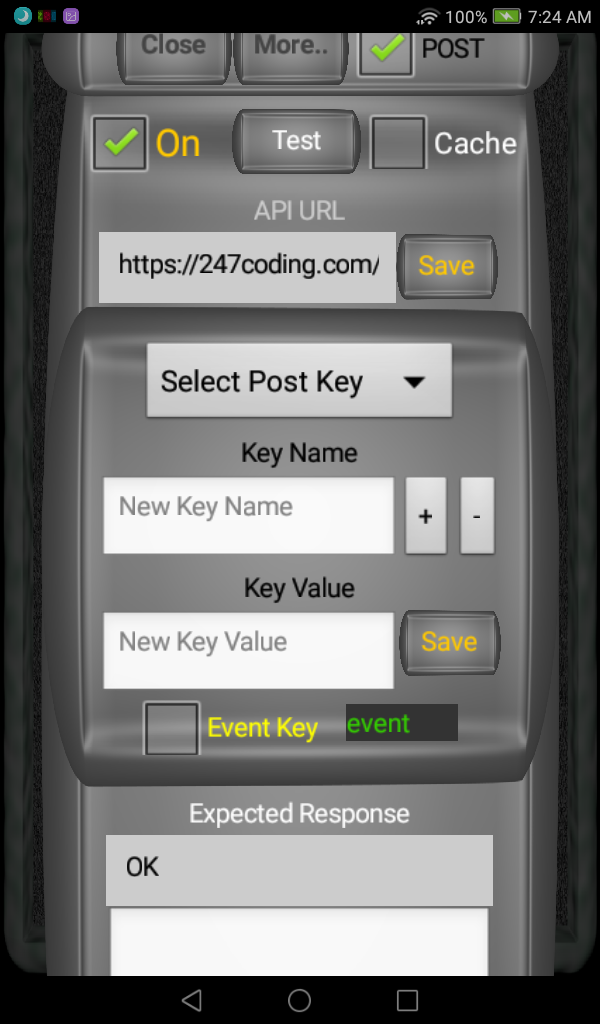
Data rates may apply while API is turned on if you are using the mobile network, just like a web browser. This data should be minimal since it is only sending small strings of data. You can reduce the data sent by WorkerBee by extending the time frame in which Worker Bee tracks data or by caching your uploads using the cache checkbox. Time frame can be set on the very first Configuration page while the cache button is on this API page.
Purpose
The purpose of the API settings is to allow you to upload your events to an API.
This is achieved by either using GET (included in address) or POST (sent in the background) methods.
Cache Checkbox
If the "Cache" checkbox is selected, WorkerBee will not send data every time an event is fired but wait until the app starts or shuts down.
Post Checkbox
On = Use POST methods, Off = Use GET methods.
API Url Text Box
This will be the URL to call your API and pass data to it. It will be something like https://apiwebsite.my/myapi.html.
A standard GET response will be something like ?mykey=1&myname=abc123&myevent=a,b,c,d,e,f
This is how worker be will build the "GET" request using your keys. It will start with a question mark (?) and then append ampersand (&) for the remaining key value pairs.
?key1=value&key2=value&key3=value
ON Checkbox
If the "API On" checkbox is checked, as WorkerBee runs it will attempt to send your event to the API.
It will set the delimited string ACTION value as either "start" when you press start, "stop" when you press stop or "auto" when the event timer expires.
Test Button
The "Test" button will fire off a test event to your API using the Keys you build in the post key dropdown (these double as GET keys).
API Configuration
API configuration is fairly straight forward. The API URL is where you put the full secure path of the API. This should be a secure (SSL-https) connection whenever possible.
Keys
To add keys to match your API requirements, simply type in the key Name and hit the "+" plus button.
To set the key value, select it from the list, enter it's value in the "Key Value" text box and click the "Save" button.
To remove a key, select it from the dropdown and hit the "-" minus button.
The event key
This is a special key and is required to send your event to the API. It can be any key in your list of keys but will have NO VALUE.
Your event will be appended to this key when the API is called.
Changing the Event Key
Once the event key is set, you can change the event key any time by simply selecting another key and click the "Event Key" checkbox.
This will change the current event key to the new event key. If not already set, just click the checkbox when you have any key selected from the key list.
Expected Response
This is the response returned from your API on a successful submit. If it does not see this string, it will assume the submit has failed. If the response matches on a successful "Test" attempt, the debug text box at the bottom should say the submission was successful. This could be a string like "success" or "ok" or nothing at all if your API returns no success response.
Dump to API Button
Once you have completed a successful API test, you can use the "Dump to API" button to dump all of your current events to your API.
This is done by appending your entire local event list to your specified "Event Key".
Once you have all of the keys set that your API requires, turn on API logging by making sure the "ON" checkbox is checked.
As WorkerBee records revents, it will send them to your API.
If all is well, you should see your events on your API server.
Events will be passed in the following comma delimited string format:
STAMP,ACTION,JOB,NOTE,LEVEL,LON*,LAT*
* Lon/Lat only if available from device
Oh, and yes you must have an internet connection of some sort and an API to point to. :)
- Log in to post comments


